
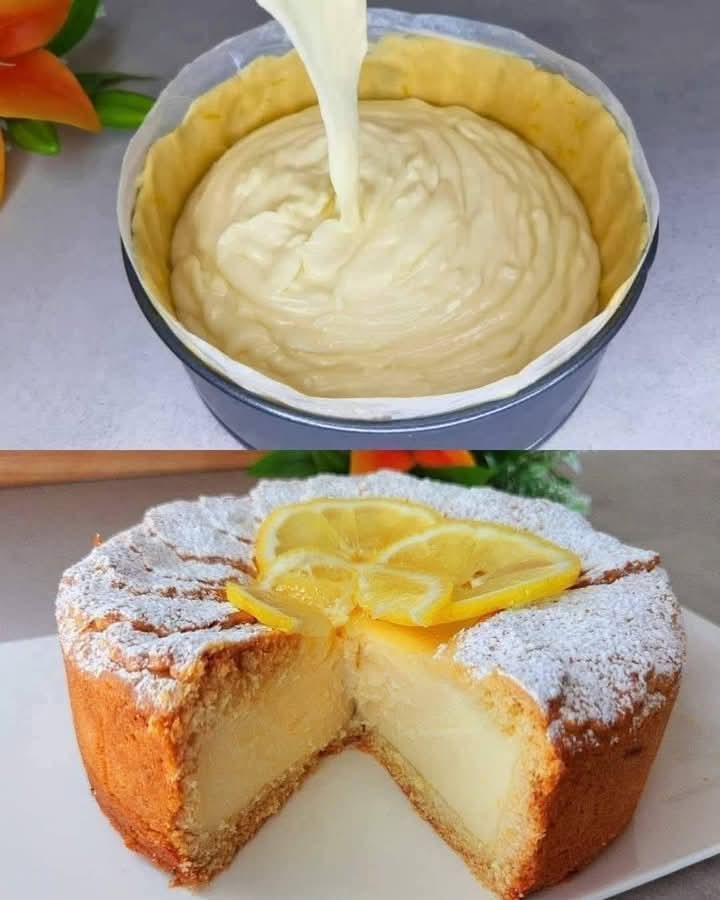
There are desserts that whisper sweetness, and then there are those that sing it with clarity and confidence. The Cheese Cream Lemon Tart belongs to the latter category — a refreshingly tangy, luxuriously smooth dessert that merges the best elements of a classic lemon tart and a creamy cheesecake. It’s a treat designed to impress, yet it's surprisingly simple to make.
In this in-depth look, we’ll explore what makes this tart so special, how to craft it perfectly from scratch, and some clever tips and variations to make it your own. Whether you’re an experienced baker or a weekend dessert enthusiast, this tart will become a go-to in your recipe box.
Why You'll Love This Tart
The Cheese Cream Lemon Tart combines three main components:
- A crunchy, buttery graham cracker crust
- A rich and fluffy cream cheese filling
- A luscious, bright lemon curd topping
Each layer serves a distinct purpose in flavor and texture:
The crust adds contrast with its crispness and toasty undertones.
The cheese cream brings body and richness.
The lemon curd finishes the experience with tart, citrusy brilliance.
Together, they form a dessert that’s indulgent but balanced, perfect for spring brunches, summer picnics, or elegant dinners.
Ingredients Breakdown
Crust:
Graham crackers or digestive biscuits – Crushed finely to form the base. You can use store-bought crumbs or crush your own.
Sugar – Just a little, to sweeten and caramelize the crust.
Butter – Melted and mixed in to bind the crust and give it flavor.
Cheese Cream Filling:
Cream cheese – Full-fat works best for creaminess. It should be softened for easy mixing.
Heavy cream – Whipped to lighten the filling.
Granulated sugar – Sweetens the filling without overpowering it.
Vanilla extract – Adds depth of flavor.
Lemon zest – Adds brightness and complements the curd on top.
Lemon Curd:
Fresh lemon juice – Key to a bold, authentic lemon flavor.
Lemon zest – Intensifies the citrus notes.
Eggs – Act as the thickener and give the curd its creamy consistency.
Sugar – Sweetens and balances the tartness.
Butter – Gives the curd a silky, melt-in-your-mouth finish.
Step-by-Step Instructions
Step 1: Make the Crust
- Preheat oven to 350°F (175°C).
- In a bowl, combine 1 ½ cups crushed graham crackers, ¼ cup sugar, and 6 tablespoons melted butter.
- Press the mixture evenly into the bottom and sides of a 9-inch tart pan.
- Bake for 8–10 minutes until golden. Cool completely before adding the filling.
Tip: Use the bottom of a measuring cup to pack the crust tightly — this prevents it from crumbling when sliced.
Step 2: Make the Cream Cheese Filling
- In a large bowl, beat 8 oz (225g) cream cheese until completely smooth.
- Add ½ cup sugar, 1 tsp vanilla, and the zest of 1 lemon. Mix until incorporated.
- In a separate bowl, whip 1 cup of heavy cream until stiff peaks form.
- Fold the whipped cream gently into the cream cheese mixture to keep it airy.
- Spread the filling evenly into the cooled tart crust. Chill while making the lemon curd.
Tip: Don’t overmix the whipped cream into the cheese; fold gently to maintain a light texture.
Step 3: Make the Lemon Curd
- In a saucepan, whisk together:
3 eggs
½ cup lemon juice
2 tsp lemon zest
¾ cup sugar
- Cook over medium heat, stirring constantly, until the mixture thickens — about 7–10 minutes. Do not let it boil.
- Remove from heat. Whisk in 6 tablespoons of cold, cubed butter until the mixture is glossy and smooth.
- Allow the curd to cool slightly before pouring it over the cream cheese layer.
- Chill the entire tart for at least 2 hours, or until fully set.
Serving & Storage
Once chilled, slice the tart with a sharp, clean knife. Garnish with:
Thin lemon slices
Edible flowers
Whipped cream
Mint leaves
Storage: Keep refrigerated in an airtight container for up to 4 days. The crust may soften slightly over time but will remain flavorful.
Freezing? Yes! You can freeze the tart (wrapped tightly) for up to 2 months. Thaw overnight in the fridge before serving.
Pro Tips for Success
Room temperature ingredients: Ensure the cream cheese is softened and the eggs are not cold. This helps prevent lumps and ensures even mixing.
Strain the lemon curd: For the silkiest texture, strain the curd through a fine mesh sieve before pouring it onto the tart.
Chill thoroughly: Don’t rush the chilling step. Each layer needs time to firm up for the best texture and clean slices.
Variations & Twists
- Berry Lemon Tart
Top with fresh raspberries or blueberries before serving for an added pop of color and flavor.
- Meringue Crown
Add a torched meringue topping over the lemon curd instead of leaving it bare. Think lemon meringue pie meets cheesecake.
- Gingersnap Crust
Substitute graham crackers with crushed gingersnap cookies for a spicy twist.
- Mascarpone Instead of Cream Cheese
For a more delicate and less tangy filling, use mascarpone instead of cream cheese.
- Mini Tarts
Use a muffin tin or mini tart pans for individual servings — perfect for parties or events.
A Brief History of the Lemon Tart
Lemon tarts have a long culinary heritage, originating in medieval Europe where citrus was prized for its exotic flavor. French pâtisserie refined the concept, turning the tart into a work of art with pâte sucrée crusts and silky custards.
The modern twist of adding a cream cheese layer is largely an American innovation — inspired by cheesecake lovers who wanted a more structured, creamy base beneath the tart lemon curd. The result is a fusion dessert that pays homage to both traditions.
Ideal Occasions for This Tart
The Cheese Cream Lemon Tart is versatile enough to shine at:
Holiday dinners
Easter brunches
Birthday celebrations
Summer cookouts
Mother’s Day lunches
Afternoon tea parties
Its elegant appearance and bright flavor make it feel special, even if you made it on a whim.
Final Thoughts
The Cheese Cream Lemon Tart is the kind of dessert that leaves a lasting impression. Every bite brings a perfect harmony of creamy richness and citrus brightness, supported by the comforting crunch of a classic crust.