There’s something magical about desserts that deliver big flavor without the hassle of baking. If you’re a peanut butter lover or cheesecake fanatic (or both!), then you’re going to fall in love with these No-Bake Peanut Butter Cheesecake Bites. They’re creamy, rich, and indulgent—everything a good dessert should be—but with a quick and easy prep that doesn’t require turning on the oven.
In today’s post, we’re diving into every delicious detail of this simple yet irresistible dessert. From the crunchy graham cracker crust to the luscious peanut butter cream cheese filling, every bite is an explosion of sweet and salty perfection. Whether you're whipping up a batch for a party, a weeknight treat, or a snack to stash in your freezer, these no-bake cheesecake bites are sure to become a favorite in your kitchen.
Why No-Bake Treats Are a Game-Changer
Before we dive into the full recipe, let’s take a moment to appreciate the brilliance of no-bake desserts. With summer temperatures soaring and busy schedules ruling our lives, there’s a real advantage in being able to skip the oven. No-bake recipes are often quicker, easier, and more forgiving—perfect for beginners or those short on time. But don’t mistake “no-bake” for “no-flavor.” These cheesecake bites are just as decadent and satisfying as their baked counterparts.
No-bake peanut butter cheesecake bites have the added bonus of combining two crowd-pleasers: peanut butter and cheesecake. Together, they form a match made in dessert heaven.
Ingredients Breakdown
Let’s talk about what goes into this recipe and why each component is essential.
For the Crust:
Graham Cracker Crumbs – The foundation of many cheesecakes, graham cracker crumbs are sweet and toasty. You can substitute with crushed digestive biscuits, vanilla wafers, or even Oreos for variety.
Melted Butter – Holds the crust together and adds richness.
Brown Sugar (optional) – Enhances sweetness and adds a deeper, caramel-like flavor.
For the Peanut Butter Cheesecake Filling:
Cream Cheese – The heart of any cheesecake, it gives the dessert its creamy and tangy profile. Use full-fat for best results.
Creamy Peanut Butter – Provides that nutty, salty-sweet flavor we all crave. Natural or commercial both work, though commercial gives a smoother texture.
Powdered Sugar – Sweetens the filling without making it gritty.
Vanilla Extract – Rounds out the flavors.
Whipped Topping or Whipped Cream – Lightens the filling, giving it that airy cheesecake texture. You can use homemade whipped cream or a store-bought topping like Cool Whip.
Toppings (Optional but Recommended):
Melted Chocolate – Drizzle over the bites for extra indulgence.
Chopped Peanuts or Mini Chocolate Chips – Adds texture and visual appeal.
Step-by-Step Instructions
Let’s walk through the process of making these irresistible bites.
Step 1: Make the Crust
In a medium bowl, combine 1 ½ cups of graham cracker crumbs with ¼ cup of melted butter. If you like a sweeter crust, stir in 2 tablespoons of brown sugar. Mix until the texture resembles wet sand.
Spoon about a tablespoon of this mixture into mini cupcake liners, silicone molds, or a mini muffin tin. Press down firmly using the back of a spoon or your fingers. Place in the freezer while you prepare the filling.
Step 2: Prepare the Peanut Butter Cheesecake Filling
In a large bowl, beat 8 oz (about 225g) of softened cream cheese until it’s smooth and fluffy. This step is crucial—softened cream cheese will incorporate better, preventing lumps.
Add ½ cup of creamy peanut butter, ⅓ cup of powdered sugar (adjust to taste), and 1 teaspoon of vanilla extract. Beat until well-combined and smooth.
Gently fold in ½ cup of whipped topping or whipped cream. This adds a lighter texture, making the filling airy and silky.
Step 3: Fill the Cups
Spoon or pipe the filling over the chilled crusts. You can use a spoon, piping bag, or even a zip-top bag with the corner snipped off. Smooth out the tops with a spatula or the back of a spoon.
Return to the fridge to chill for at least 1–2 hours or to the freezer for 30–40 minutes if you're short on time.
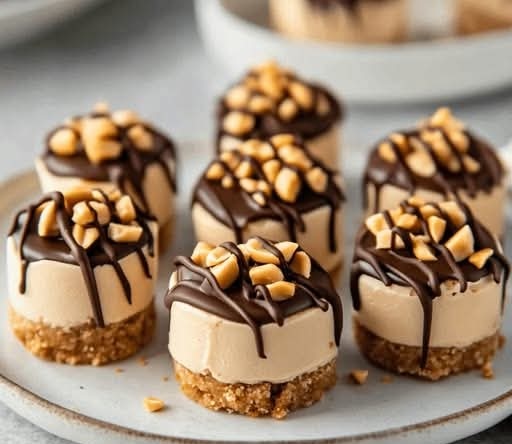
Step 4: Add Toppings (Optional)
Once the bites are set, drizzle them with melted chocolate and sprinkle with chopped peanuts or mini chocolate chips. Not only does this step make the bites look gorgeous, but it also adds a lovely crunch and a boost of flavor.
Tips and Tricks for the Perfect Bites
Use Silicone Molds or Mini Liners – These make removal easy and mess-free.
Let Cream Cheese Soften – This ensures a smooth, lump-free filling.
Don’t Overmix the Whipped Topping – Gently fold it in to maintain the light texture.
Chill Well Before Serving – This helps the bites hold their shape and enhances the flavor.
Flavor Variations to Try
Once you master the base recipe, you can get creative:
Chocolate Swirl – Add melted chocolate or Nutella to half the batter and swirl for a marbled look.
Jelly Center – Drop a small spoonful of strawberry or raspberry jelly in the center before adding the filling.
Salted Caramel Drizzle – Instead of chocolate, use caramel sauce and a sprinkle of sea salt.
Crunchy Peanut Butter – Adds extra texture and nutty crunch.
Storage and Make-Ahead Tips
One of the best things about these bites is that they store beautifully. Place them in an airtight container and keep them:
In the fridge for up to 5 days
In the freezer for up to 2 months
If frozen, let them thaw at room temperature for 10–15 minutes before serving.
They’re a fantastic make-ahead treat for parties, potlucks, or holiday dessert tables. You can also pack a few in lunchboxes or keep a secret stash for those late-night cravings!
Healthier Alternatives
While these bites are indulgent, you can make a few tweaks to lighten them up:
Use reduced-fat cream cheese and light whipped topping
Choose natural peanut butter with no added sugar
Swap graham crackers with gluten-free or sugar-free alternatives
Reduce the sugar or use a sugar substitute like Stevia or monk fruit sweetener
Even with healthier ingredients, these bites remain delicious and satisfying.
Why Everyone Loves Them
These cheesecake bites check all the boxes:
No oven required
Minimal ingredients
Quick to make
Peanut butter + cheesecake = perfection
Freezer-friendly
Customizable
Whether you're a baking novice or a dessert enthusiast, this recipe is approachable and practically foolproof. Plus, they’re incredibly satisfying—rich, creamy, a little salty, a little sweet, and totally addictive.
Final Thoughts
There’s something wonderfully comforting about peanut butter desserts. Combine that with the elegance of cheesecake, and you’ve got a treat that’s universally loved. These No-Bake Peanut Butter Cheesecake Bites deliver on all fronts: flavor, texture, convenience, and craveability.