
When it comes to desserts that combine simplicity, flavor, and elegance, no-bake peanut butter cheesecake balls hit all the right notes. These treats offer a melt-in-your-mouth texture, a rich peanut butter taste, and a tangy cheesecake finish that’s impossible to resist. Best of all? You don’t even have to turn on the oven.
Whether you’re preparing for a family gathering, a party, or simply satisfying your sweet tooth, this recipe delivers decadent flavor with minimal effort. Keep reading to discover the ultimate guide to making perfect no-bake peanut butter cheesecake balls at home.
Why No-Bake Desserts Are Everyone’s Favorite
No-bake desserts like these cheesecake balls are growing in popularity for good reason. They are easy to prepare, require minimal ingredients, and are ready in no time. Plus, they save energy and keep your kitchen cool—perfect for hot summer days or quick last-minute dessert needs.
In particular, peanut butter cheesecake balls combine rich, nutty flavor with creamy cheesecake goodness. They’re portion-controlled, portable, and perfect for sharing.
Essential Ingredients for the Best Flavor
To create the perfect batch of no-bake peanut butter cheesecake balls, you’ll need these simple yet flavorful ingredients:
- Cream Cheese (8 oz): Use full-fat, room-temperature cream cheese for a rich and smooth base.
- Peanut Butter (1 cup): Choose creamy peanut butter for a silky texture. Natural peanut butter works, but stir it well first.
- Powdered Sugar (1 cup): This adds sweetness and helps firm up the mixture.
- Vanilla Extract (1 tsp): Enhances all the other flavors with a subtle sweetness.
- Graham Cracker Crumbs (1 cup): Adds structure and a light crunch.
- Chocolate Chips or Melting Wafers: Optional, but highly recommended for coating or drizzling.
- Toppings (Optional): Crushed nuts, cookie crumbs, mini chocolate chips, or festive sprinkles.
Simple Step-by-Step Instructions
Step 1: Prepare the Creamy Base
In a large mixing bowl, beat the softened cream cheese and peanut butter until the mixture is smooth and fluffy. This should take around 2–3 minutes using a hand mixer or stand mixer.
Step 2: Add Sweetness and Flavor
Add the powdered sugar and vanilla extract. Mix until the sugar is fully incorporated and the texture is thick and creamy.
Step 3: Mix in the Crunch
Fold in the graham cracker crumbs. The mixture will become firmer and slightly textured. If the mixture is too soft, add an extra tablespoon or two of crumbs.
Step 4: Chill the Mixture
Cover the bowl with plastic wrap and place it in the refrigerator for 30 to 45 minutes. This step helps firm up the dough, making it easier to roll.
Step 5: Roll Into Balls
Once chilled, scoop out portions of the mixture and roll them into 1-inch balls. You can use a small cookie scoop for even sizes. Place the balls on a baking sheet lined with parchment paper.
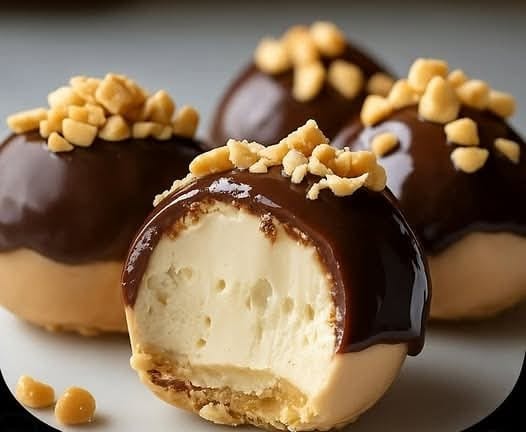
Step 6: Add the Chocolate Touch (Optional)
If desired, melt your chocolate chips or wafers in a microwave-safe bowl. Dip each ball halfway or drizzle the chocolate over the top. Add sprinkles, crushed peanuts, or cookie crumbs while the chocolate is still wet.
Step 7: Final Chill
Refrigerate the finished balls for at least 20 minutes or until they are set and firm to the touch.
How to Store and Serve Cheesecake Balls
Store your peanut butter cheesecake balls in an airtight container in the refrigerator. They’ll stay fresh for up to 5 days. If you want to make them ahead of time, they also freeze beautifully for up to a month. Just thaw in the fridge for an hour before serving.
Serve them chilled for the best texture and flavor. They’re ideal for dessert trays, party platters, or afternoon snacks.
Creative Variations You’ll Love
Chocolate-Coated Cheesecake Balls
Dip each ball completely in melted chocolate and let it harden. This version is perfect for chocolate lovers.
Oreo Peanut Butter Cheesecake Balls
Substitute graham cracker crumbs with crushed Oreos. The extra chocolate from the cookies adds a new level of richness.
Peanut Butter Pretzel Balls
Fold in crushed pretzels for a salty crunch that balances the sweetness.
Holiday-Themed Balls
Add red and green sprinkles for Christmas, pastel sugar for Easter, or heart-shaped confetti for Valentine’s Day.
Mini Peanut Butter Cheesecake Truffles
Roll the balls smaller and serve them as mini truffles, perfect for gifting in small treat boxes.
Expert Tips for Perfect Results
- Use Room-Temperature Ingredients: This ensures smooth mixing and an even texture.
- Chill Before Rolling: The dough must be cold to shape easily. If too soft, it won’t hold together well.
- Avoid Overmixing: Blend ingredients until combined but don’t overmix or the mixture could become too loose.
- Customize Your Texture: Want a smoother finish? Use more powdered sugar. Prefer more structure? Add extra crumbs.
Healthier Options and Substitutes
If you’re looking to make a lighter version, consider these swaps:
- Use Reduced-Fat Cream Cheese: It will slightly alter the texture but still tastes great.
- Opt for Natural Peanut Butter: Be sure to stir it well to avoid oily or runny mixtures.
- Try Coconut Sugar or Maple Syrup: These natural sweeteners can be used instead of powdered sugar, but may affect consistency.
- Add Protein Powder: Mix in a scoop of vanilla or chocolate protein powder for an energy-boosting snack.
Why These Peanut Butter Cheesecake Balls Are So Popular
- Quick to Make: From start to finish, you’re done in under an hour.
- No Baking Required: Save time and energy while still creating an indulgent dessert.
- Kid-Friendly: Fun to make and eat, these treats are great for little hands.
- Perfect for Any Occasion: Elegant enough for a party, simple enough for everyday snacking.
- Endlessly Customizable: Change the toppings, mix-ins, or size depending on your mood or event.
Serving Suggestions for Any Occasion
Casual Gatherings
Arrange the cheesecake balls on a platter with toothpicks. They’ll disappear fast at game nights or potlucks.
Holiday Parties
Use festive liners or colored sprinkles to match your celebration theme.
Birthday Treats
Offer a variety—some dipped in chocolate, some coated in nuts, others plain—for a mini dessert buffet.
Gift Boxes
Wrap a few in mini cupcake liners and box them for homemade edible gifts during holidays or birthdays.
Wedding or Baby Showers
Choose pastel sprinkles or elegant gold dust for a classy presentation.
Common Mistakes to Avoid
- Using Cold Cream Cheese: This makes the mix lumpy and hard to blend.
- Skipping the Chill Time: Warm dough won’t hold its shape well during rolling.
- Too Much Sugar or Crumbs: This can dry out the mixture. Always start small and add as needed.
- Improper Storage: Leaving them out too long causes softening. Keep them chilled until just before serving.
Frequently Asked Questions (FAQs)
Can I use almond butter instead of peanut butter?
Yes! Almond butter offers a milder taste and works great as a substitute.
How long do these cheesecake balls last?
Stored properly in the fridge, they’re good for five days. In the freezer, up to one month.
Can I use crunchy peanut butter?
Absolutely! It adds texture. Just ensure it’s well mixed before adding.
What’s the best way to coat the balls in chocolate?
Use a fork to dip them fully, then tap off the excess. Place on parchment to set.
Final Thoughts
No-bake peanut butter cheesecake balls are the perfect marriage of convenience and indulgence. With minimal ingredients, a short prep time, and endless ways to customize, they’re a must-try for every dessert lover. Whether you prefer a classic peanut butter flavor or want to dress them up with chocolate and toppings, this recipe delivers every single time.